
A while back I posted a picture of some booklets I was working on. Yesterday I finally finished them. Somehow I kept bumping into a wall while making these. So I'm really glad it all came together in the end.

Two of them are already spoken for. I don't know what to do with the last one yet, but I'm sure it will find a good home as well.
I did make some progress shots while making them so I can show you how I made them.
I started out with some tea dyed papers and tore them all to size. As I was being lazy and didn't want to calculate how big they needed to be, I just folded the tea dyed printer A4 papers in halves lengthwise and then in fours. Did the same in the other direction after which I had a piece of paper with 16 rectangles.

I then butted my ruler up against the folds and tore the pieces along the edge of the ruler. Leaving me with pieces approximately 7.4-5.2 cm (2 15/16 "-2 1/16"). I folded those in halves again to form the folios in the signatures.

I put the signatures together with 4 folios each and kept 6 of them together with clothes pins in a book block.

I measured and marked the middle of each set and about a cm from the sides and marked the entire book block with a pencil.

I pricked holes in each signature and sewed them together, keeping in mind to keep them always in the same direction and order as they were marked.

I glued the spines twice with PVA and then glued the endpapers to the book blocks. After which I glued some muslin to the spine for extra reinforcement.

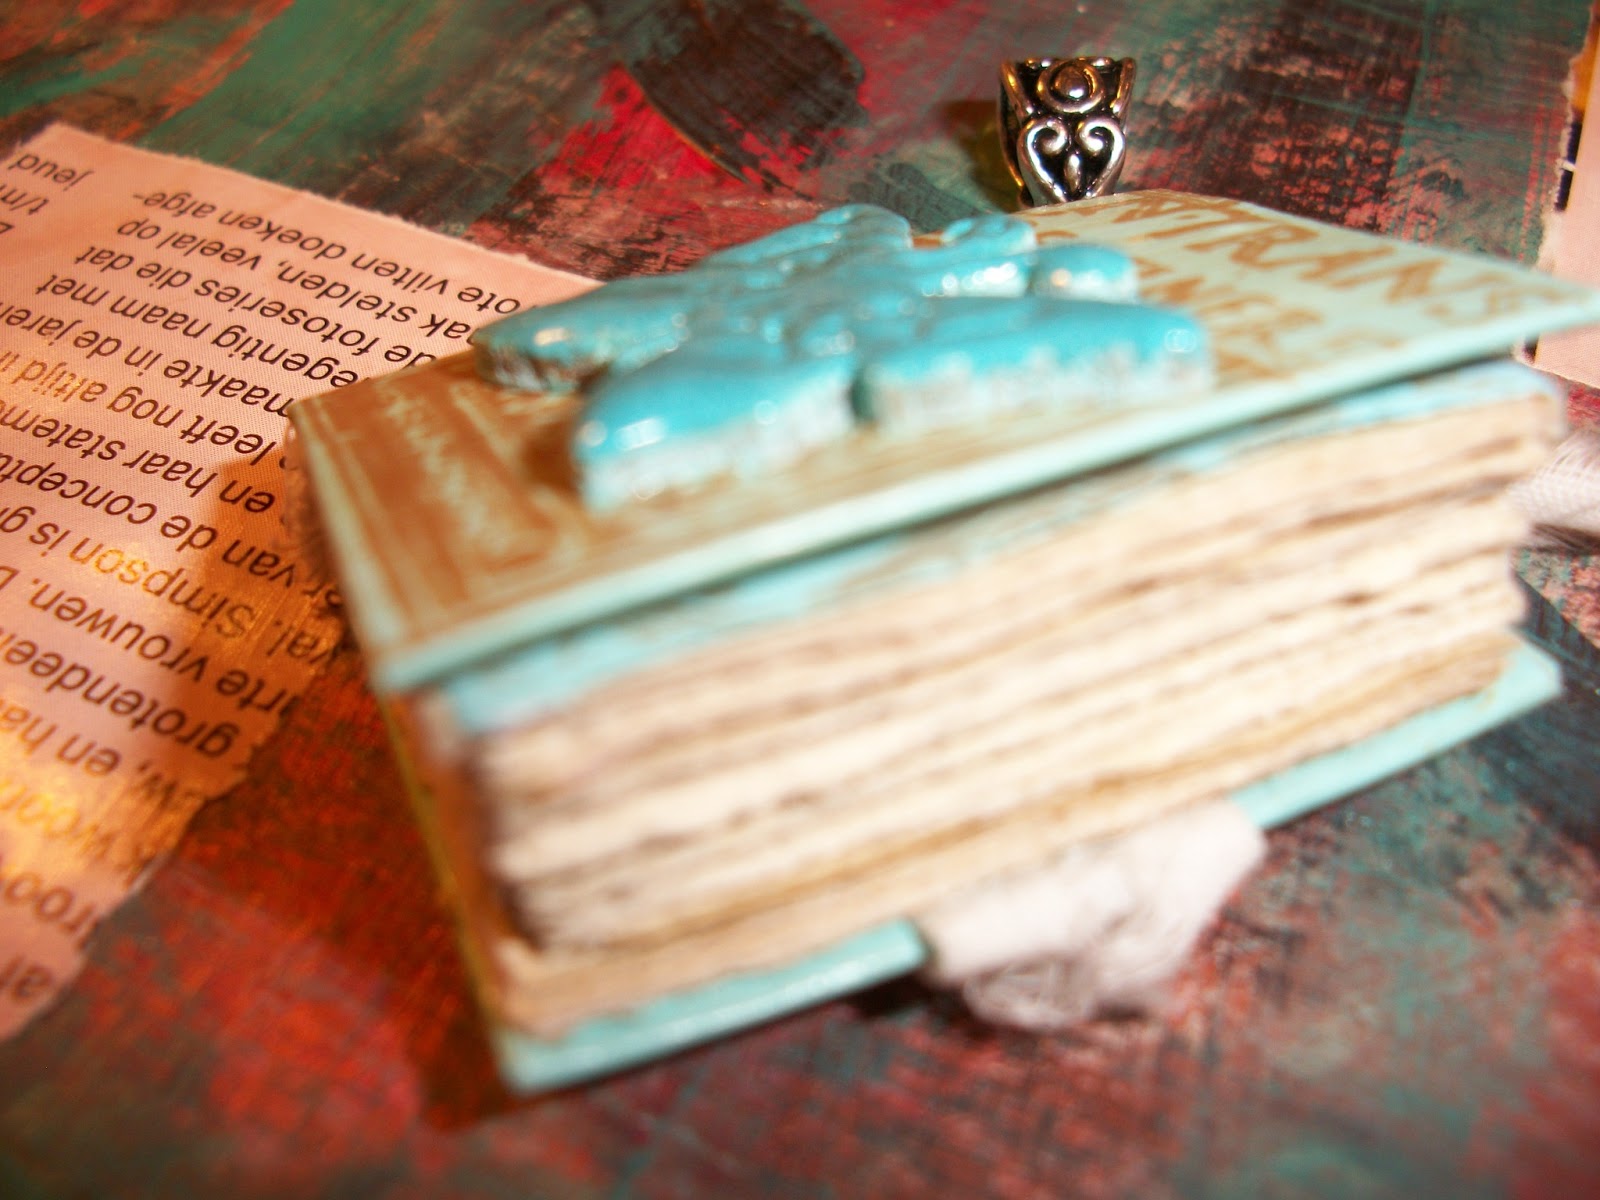
The wooden butterflies were painted blue and then embossed with blue embossing powder. I also painted some test papers blue and stamped on them to find out which color I liked best for the covers.

As you can see, I went with the sepia archival ink.
I forgot to make pictures from making the covers, but they are basically a front and back piece, slightly larger than the book block. The width of the spine is the width of the book block spine.

These were then covered with the painted papers and then stamped. I rounded the spine somewhat and glued some white fabric strips to the back cover on the inside.

I Attached the endpapers to the covers and the butterflies to the front. Painted a little key with the same blue and sewed it to the fabric.

As a last step I pierced the spine and attached the hanger thingy to it using two jump rings.


I do like how they turned out, even though, for some reason, I kept postponing finishing them
On a side note, I did notice I am reaching a milestone for my blog with nearly a hundred followers now. I find it very encouraging that so many of you enjoy my blogposts and work enough to follow me. Being fairly new at crafting, I keep getting amazed and surprised by the kindness and warmth of this crafting community. You are all such wonderful, talented and inspiring people and I'm happy to be a part of this.
Thank you all so much for watching and I wish you a wonderful week.
Linking this to:
Linking this to:
- Simon Says Stamp and Show Challenge: a little stamping (as I used a tiny bit of a big stamp to make my covers)
- Creative Every Day Check-In: Juli 8 - 14
Such beautiful little creations Monique. Love the intricacy of each book and the choice of stamped image. Hugs, Jenny x
ReplyDeleteOh I love these and a fantastic tutorial too!
ReplyDeleteGeweldige boekjes weer :)
ReplyDeletewowswers!!! Monique, so well done such tiny works of love and care, great share! Shaz in Oz.x
ReplyDeleteMonique....these little books are amazing! I love how you've even gotten great detail on the torn pages...making them look almost like handmade paper. Very cool idea! Love the little signatures you've made for each book. Talk about DETAIL! WOW! I also love your book covers with the small blue butterflies. Very pretty! Thanks so much for sharing your art with us at Simon Says Stamp and Show. <3 Candy
ReplyDeleteOOh Wow!!! this little books looks amazing,beautiful design and colors,love it to much with the little sweet details.
ReplyDeleteGreetings Jeannette
The fact that these little books are totally handmade is mind blowing! Your detail is just astounding! The covers are perfect, and the little tiny stamping wonderful! I love the gold and turquoise colors too! Fabulous and FUN makes! Thank you so much for stamping a little with us this week here at Simon Says Stamp & Show!
ReplyDeleteYour work is fantastic! Valerie
ReplyDeleteJust gorgeous books! I love your blog and will be back when I can take my time to see everything! :)
ReplyDeleteWat een prachtige boekjes! Knap gemaakt.
ReplyDeleteYour tiny books are simply wonderful, Monique!
ReplyDeleteAlison x
Monique these little books are absolutely brilliant so beautifully made. I love them ! X
ReplyDeleteAdorable little things...I admire your patience!
ReplyDeleteWat een enorm leuk resultaat Monique...je boekjes zien er super uit!
ReplyDeletegroetjes, Alie :-)
Oh... such a cool idea! they are beautiful, love the colors
ReplyDeletelove these little books and the step outs are fantastic. Thank you! Your art leaped out at me from the thumbnails at Creative Everyday.
ReplyDeletewow schitterende boekjes zijn het geworden, mooi van kleur en zo klein!! Groetjes Karin
ReplyDeleteWhat a great tutorial! I just have to try this...would love to do some as gifts. So glad I stopped by from Creative Every Day! - janice
ReplyDeleteAh, these are little treasure!
ReplyDelete